HOW DO I MEASURE MY GREAT TREE NOMINATION?
CIRCUMFERENCE
Tools Needed: Tape Measure (ideally a cloth flexible measuring tape)
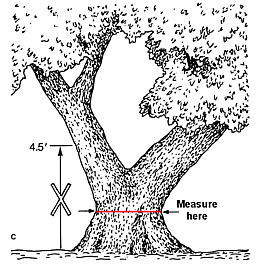
Record the smallest trunk circumference between the DBH point (4.5 feet or 1.3 meters) and the ground, but below the lowest fork. Also record the height above the ground, in inches, where measurement was taken (figures B&C).
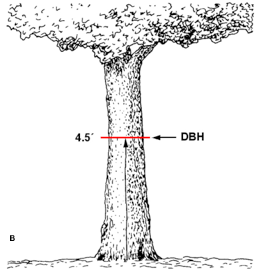
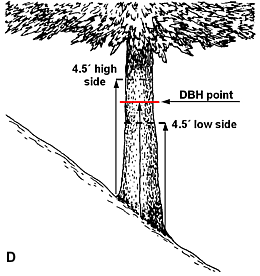
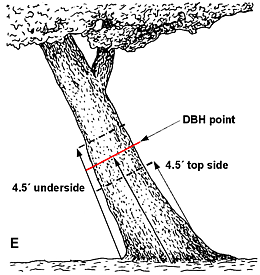
Determining DBH Point
Measure up 4.5 feet or 1.3 meters along the axis of the trunk on high and low sides; DBH point is midway between these two planes (D).
Low Branches: When determining where on the trunk to measure circumference, ignore portions that do not form part of the tree’s crown, such as dead branches or forks, and epicormic sprouts.
Obstruction at DBH: If there is a bump, burl, branch, or other obstruction at the DBH point, measure circumference above and below the obstruction and record the smaller value.
HEIGHT
General Rule: Record the vertical distance between the ground line and the tallest part of the live crown, in feet. Also record the method used to determine this value. (Choices include: clinometer, stick method, pencil method, comparison, and wild guess.)
Leaning Tree: Height is not measured or estimated along the length of trunk.
Stick Method
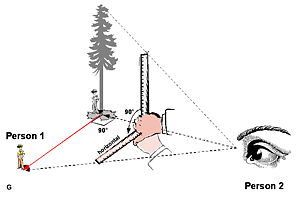
One person stands near the trunk of the tree and the second person stands at a distance where both Person 1 and the top of the tree are visible. Person 2 holds a ruler (or pencil) upright at arms length and (carefully!) walks forward or backward until the entire length of their ruler covers the tree from base to top (F). Still holding the ruler at arms length, Person 2 turns their wrist right or left so that the ruler is now horizontal, with one end sighting the base of the tree. Now Person 2 instructs Person 1 to move away from the trunk in the direction the ruler is pointed (at a 90 degree angle) until they are standing where the end of the ruler points (G). Person 1 is now standing roughly the same distance from the trunk as the tree is tall. Use a tape measure to record this distance, in feet.
The image below shoes a field technician making a tree height measurement using the “stick method”. Height estimations are based on the simple geometric formulas of Similar Triangles.

Similar Triangles for the Stick Method,
B = A * b/a
(Where A, a and b and the technician’s height are known distances; A is calculated from the Pythagorean theorem where A = the square root of
HEIGHT
Pencil Method
There is also another technique known as the “pencil” method. For this you can use your pen or pencil, or anything of similar shape and size. In this method it is not important that the length of the stick above your hand on your outstretched arm is equal to the distance from your eye to that same point of the pencil where it is held in your hand. Simply hold out the pencil and move toward or away from the tree until the top of the pencil is lined up with the tree’s highest point and the bottom of the pencil lines up with the spot directly below that highest point. Then turn your hand so that the pencil is “laid down” on the ground, keeping the bottom at the same point. Visually mark the location where the top of the pencil now is found on the ground out away from the tree (It helps to have a second person for this purpose). Tree height should be equivalent to the distance from the pencil bottom spot to the new pencil top spot >as long as that point is at a right angle to you!
HEIGHT
Using a Clinometer
A clinometer is a relatively simple mechanical device for measuring height of trees in the field by taking sight measurements and applying trigonometry to measured angles and known distances to calculate height.
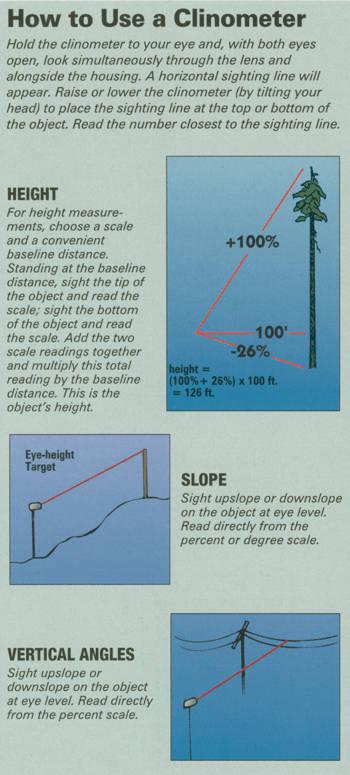
- Measure the horizontal distance from the base of a vertical tree (or the position directly beneath the tree tip of a leaning tree) to a location where the required point on the tree (e.g. tree tip) can be seen.
- Sight at the required point on the tree:
Using one eye: Close one eye and simultaneously look through the Suunto at the scale and ‘beside’ the Suunto at the tree. Judge where the horizontal line on the Suunto scale would cross the tree.
Both eyes: With one eye looking at the Suunto scale and the other looking at the tree, allow the images to appear to be superimposed on each other and read where the horizontal line on the Suunto scale crosses the tree. - Read from the percent scale and multiply this percentage by the horizontal distance measured in step one.
- Site to the base of the tree and repeat steps 2 – 3.
- Combine the heights from steps 3 and 4 to determine total tree height:
Add the 2 heights together if you looked up to the required point in step 2 and down to the base of the tree in step 6.
Subtract the height to the base of the tree from the height to the required point if you are on sloping ground and had to look up to both the required point and the base of the tree. - Check all readings and calculations.
RECORDING LOCATION
On the nomination form – at minimum the geographic township information and a map is required. For those that have access to a GPS unit it is important that you submit your information in the format provided for on the nomination form.
Here is a quick step by step process for those using their GPS to mark the location of their Great Tree.
The basis of the GPS technology is a set of 24 satellites that are continuously orbiting the earth. These satellites are equipped with atomic clocks and send out radio signals as to the exact time and their location. These radio signals from the satellites are picked up by the GPS receiver. Once the GPS receiver locks on to four or more of these satellites, it can triangulate its location from the known positions of the satellites. This is a very simple explanation, but unless you are a surveyor or engineer who needs to understand how to use GPS to locate within fractions of an inch, this is all you really need to know.
The functionability of a receiver is dependent on the ability to receive signals from the satellites. Certain locations such as under very thick foliage or down in the bottom of a slot canyon will preclude your receiver from getting a good signal from enough satellites to determine your location. With many of the newer receivers however, these problems are minimal. All receivers have warning messages when they are not getting sufficient signal to properly navigate.
Accuracy:
The accuracy of the receivers is dependent on the number and quality of the signals it is getting from the satellites and from a factor called Selected Availability.
Selected Availability is an intentional error that is introduced into the signals coming from the Satellites that create readings that can be off as much as 300 feet. Even so, the accuracy levels with Selected Availability turned on, is usually within 100 ft. or better.
Other factors effect accuracy such, quality of GPS signals from the satellites, and operator error. Operator error can include such things as inputting the wrong values for position coordinates and as using the wrong datum for the map being referenced.
Once the receiver is initialized and set-up, the most useful and immediate function is to save the current position as a waypoint.
Saving Current Position as a Waypoint – the location of your Great Tree:
To save the current position as a named or numbered waypoint you must access the function for your unit that does this. On many of the Garmin units, the “MARK” button is specifically for this purpose. Other units may access a menu first where “Create Waypoint” or some other related option is available. Usually, the current position coordinates are then displayed and can be edited if you choose to create a waypoint that is not the current location. If you are saving the current position, you then proceed with the menu choices to name and save the waypoint. With many units available, the waypoint will automatically be assigned a sequential number that can be changed to a name of your choosing. This is so a waypoint can be saved quickly and the name noted. You can go back later and rename it if you choose or you can rename it as you are saving it initially. The naming process is usually simple using the up and down arrows of your keypad to choose various letters and the left and right arrows being used to move to the different characters. This process will be adequately described in the user’s manual.
Ensure you name your waypoint – the location of your Great Tree – with a name you can remember. When you return from the field call up the waypoint you saved and record the following information in the prescribed format below. If you do not see the co-ordinates for your waypoint in this format – don’t worry – just go to settings and change to a longitude and latitude format for your unit – go back to the created waypoint and your units will be in the proper format.
GREAT TREEHUNT GPS LOCATION FORMAT
| GIS COORDINATES Datum NAD 83 |
N |
o | ’ | . |
W |
o | ’ | . |